
Campaign Prep
One of our big goals with Shard Tabletop is to make it easier and more fun for DMs and players to play D&D. When playing a D&D session up front preparation makes running a session move quicker and allows for more creative interaction with less waiting, but it can also be tedious and time consuming to do. We have built a set of capabilities to reduce the effort and provide flexibility in doing that preparation.
The easiest way to reduce preparation effort is use a published adventure. With a published adventure someone else has written the book with descriptions for setup and all of the encounters, loaded all of the maps, created new monsters and items, and designed all of the encounters by placing monsters and assigning treasure. Preparation is simply a matter of reading and reviewing the material before running any sessions. We are working to produce our own adventures and working with other publishers to include their adventures within Shard Tabletop. Even with an abundance of published adventures, we want to allow DMs to express their own creativity to build their own adventures, or modify published adventures to create their own unique experiences.
Maps
Maps provide the foundation for any virtual tabletop. While Shard Tabletop does not have a mechanism for creating maps, it does make it easy to import any image that is in .jpg or .png format. You can upload a map image in the from the Artwork page or from any place that you pick a map. The image for a map is always stored as art, with the map referencing the art. This allows you to use the same art for multiple maps, useful for a battle map image used in multiple maps. It also allows you to change the art for a map while maintaining the rest of the state for the map.

The map settings dialog allows you to set the basic attributes of the map:
Name: name used to identify the map.
Type: basic type of the map: battle, building, city/town, continent, dungeon, region, or world.
Environments: environments found on the map.
Scaling: describes scale of the map. The grid size determines the width of the alignment grid displayed and used to calculate the overall map dimensions. When maps are displayed they always use a 5ft grid, but they will align with the upper left hand corner of the alignment grid.
Change Image: allows you to select different artwork or upload a new art image. Note: be careful when changing the image if you don’t want to have previous map pins misaligned. Pins are always relative to the upper left corner of the image.
After creating a new map or clicking on a map in maps page, you are taken to the map viewer. The same basic map viewer is also available in book build mode and the encounter builder. The map settings returns you to the dialog show above allowing you to change any of the settings for a map.
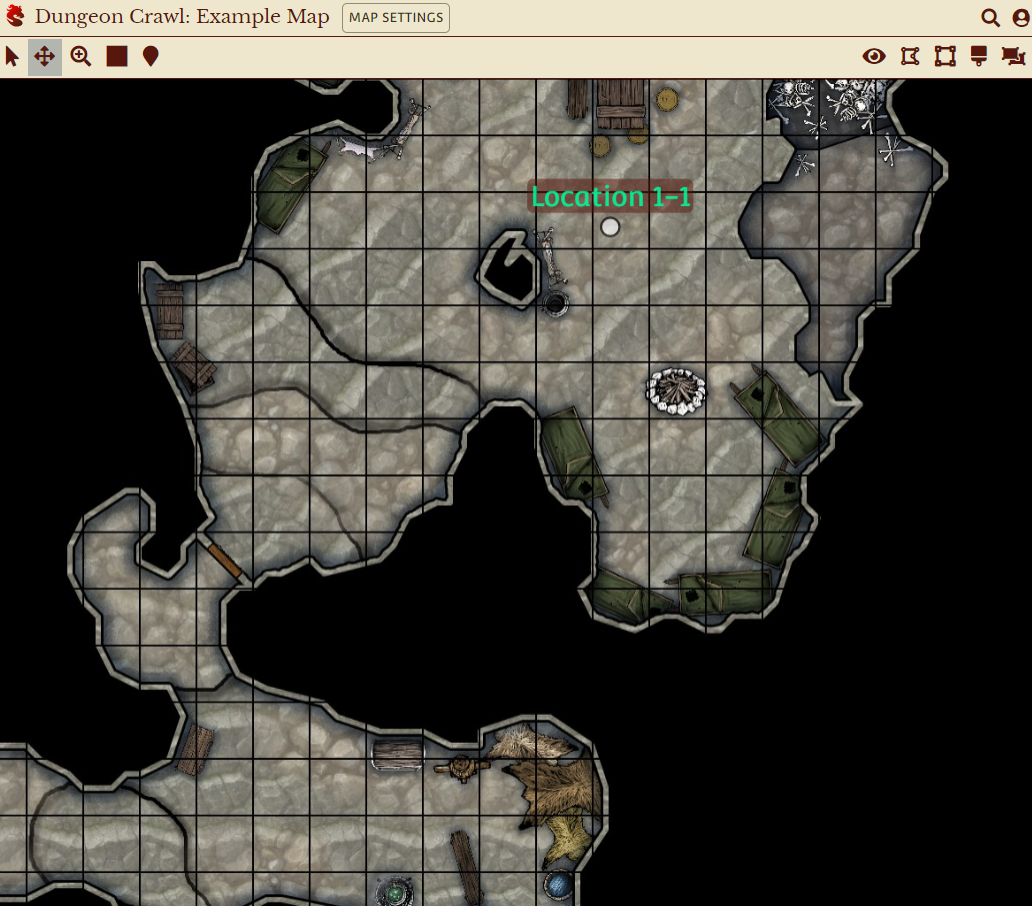
The tools have the following functions (left to right):
Project (square with arrow): toggle projecting the map to a second window. The second window will show the player view of the map. This second window can be moved onto a second screen to project when playing in person. Clicking on the new map will maximize the window without any borders. Note: this button will not display on mobile phones or tablets where the ability to project a second screen is unavailable.
Select (pointer arrow): place map in select mode. In select mode you can click on pins and map tokens to move and rotate them. Single click on the tokens will also bring up the menu to perform actions.
Move (four arrows): place map in move mode. In move mode clicking on the map will allow you to move the map. Note: in other modes right click drag will also allow you to move the map.
Zoom (magnifying glass): displays tools to adjust the zoom level of the map. The plus zooms in on the map and the minus zooms out on the map. Fit scales map to show all entries on the map, all shows the whole map and zoom makes the zoom level appropriate for a 5ft scale.
Grid (square): toggle display of a 5ft grid. The grid is aligned based on the map settings and will be hidden if you zoom out too far.
Pick (picture): pick a new map to display. You can choose a recently selected map, pick from the full list of maps, upload a new map, or search the web for a map.
Pins: toggle display of different pin types. The move group pin allows you to move all of the players together and can be useful for finding characters on a large scale map where the tokens are very small. Location pins identify locations on a map with labels that can include references to books, encounters or other maps. Previous Encounter pins show where finished encounters were. These can be handy to see where the campaign has been and can be used to restore the state of a previous encounter, possibly finish any tasks from the encounter.
Fog (eye): provides a menu of actions to control fog of war on the map. Undo will undo the last unfog action or the last vertex when creating a polygon. Clear all removes all fog from the map, while Reset covers the entire map with fog.
Polygon (5 point shape): allows you to unfog a polygon region. While in this mode an initial click will start a polygon. You can then click as points as you want and when you click the original point the polygon will be closed and unfogged.
Rectangle (square): allows you to select a rectangle to remove fog from the map.
Brush (brush): allows you to paint to unfog the map using a circular brush of various sizes. Note: if you start unfogging in a fog region then only areas within that region will be unfogged.
Fog Regions (overlapping rectangles): enters fog region mode. Existing regions will be highlighted on the map along with the vertices. You can drag the vertices to adjust regions or create new regions similar to using the polygon tool.
In addition to actions on tokens there are also menu actions available on the map and pins.
On the Map:
Center: move the map to center on the selected spot.
Huddle: group monsters or characters that are in combat around the selected spot. This will also add any entries not already on to the map.
Add Monster: this will bring up the monster picker dialog to add new monsters. Any monsters added will be grouped around the selected location.
Add Location: this places a location pin on the map linked to the book if one is selected. These are useful when you want to identify named locations on a map, for example, the names of different taverns or shops in a town.
Add Token: this will allow you to add a token to the map. If a token is added then the map will switch to select mode to allow you to position and rotate the token.
Unfog/Restore Fog: if you are over a fog region then you can choose to unfog or restore the fog to the region.
Delete Fog: if you are over a fog region then you can delete the fog region.
New Encounter: this will create a new encounter pinned to the selected location.
Set Encounter Location: in an encounter view this will move the pin for the encounter to the selected location on the map. Note: this will also adjust the book location for the encounter based on the current book location as well.
Pin Map: this will allow you to select a map to pin to the location. Clicking the location will allow you to go to the pinned map. This is useful to allow you to go to a more detailed map or to move between floors in a building.
Pin Actions will appear when you click on a pin:
Show/Hide Pin: this controls if the pin will show to players. Generally pins will be hidden, but could be shown as players discover locations or to show well known locations on a map.
Edit Encounter: show the details of the encounter.
Set Encounter Book: sets the book location associated with the selected encounter to the location of the currently selected book, chapter, section and sub-section.
Go to Book: change the book selection to the book, chapter and section.
Go to Map: navigate the pin to the linked map.
Rename: rename a pin.
Delete: delete a pin. Note: for an encounter pin this will also delete the encounter.
Encounters
Encounters provide the primary building block for running a D&D session. Each encounter has a location on a map, a set of monsters or non-player characters, treasure, map tokens, and optionally a link to a location in a book. In addition to having a pin on a map, the monsters and non-player characters can also be placed on the map. When an planned encounter is added to the current encounter in adventuring mode, then all of the monsters, non-player characters and map tokens are added to the combat tracker and show up on the map if they were placed on the map along with any assigned treasure. The book section is also moved to the linked book location, making the text readily available for the DM to read any details associated with running the encounter.

The image above shows the encounter builder dialog, which is split into three sections:
Book: shows the book associated with the encounter. The book is fully editable, allowing you to add content as needed to describe the encounter, including linked images or inset text that can be show to players as handouts, or monster blocks with information about a non-player character. Note: a book connection is not required for an encounter and in some cases will not be shown.
Map: shows the map for the encounter with the capabilities described above. Note: that you can change the map shown to maps other than the location assigned for the encounter. This can be necessary when you have an encounter that may start on one map but overflow to multiple, for example: multiple stories in a building.
Combat Tracker: shows all of the monsters, non-player characters and map tokens assigned to the encounter.
The combat tracker generally works the same here as it does in the adventuring view. Add Monster will add a monster to the tracker. Add Token will add a map token. Add Treasure makes it easy to add treasure for the encounter. It will let you pick the treasure and a map token associated with the treasure. This can be as simple as a single treasure chest or pile of coins for the treasure or could be a token for a special container or hidden stash. The initial locations of entries and visibility will be based on the values in the combat tracker.
You can also include monsters or non-player characters that show up, but are not included in combat by setting their state to “non in combat”. This works well if you want to populate a tavern with many patrons, but some of which are not engaging with the players by default, although they could during play.
Creating Encounters
You can create and edit encounters in multiple ways. Encounters can be created from any of the map viewers, adventuring mode, map, details or book edit mode. Select or create a new map. Click on the map where you want an encounter and select New Encounter. Select a name and then you can add monsters to the encounter. When you are finished close the encounter and you can continue to create new encounters. In this way you should be able to quickly populate a map with encounters. While this model works well for quickly creating encounters it doesn’t really work for developing the story of an adventure.
To develop the story, instead of starting with the map, you want to start with a book. To start a book for an adventure, you can click New Book on the campaign page. Selecting the Adventure Template as a base book will give you the basic outline of an adventure to start your book. While you are in edit mode for the book, you can click the Show Map button to display a map side by side with the book.

In this mode you can write your story elements in the book, and create encounters using the map viewer. Now when you create encounters they will also be linked to the book, allowing you to describe the story and flow of the encounter.
You can also add elements to the book to show to players while playing the adventure. Inside the rich edit for the sections you can add inset text using the inset tool (double quote icon). The inset text will show in as an indented block in the book. While in adventure mode you can click the inset text to display it as a handout. You can also setup images to show to players by adding artwork to the book. Clicking the add content tool (box with list icon) will bring up the attach content dialog.

With the add content tool you can include the details of different entry types inside of the book. In this case you can select any artwork to use as handouts. With the default settings thumbnails will display in the book that you can click in adventuring mode to display the handout to the players. For encounters, it can also be interesting to include details about monsters, non-player characters, or magical items.
Tip: you can also use this dialog to create items directly into the book.
Using this combination of books, encounters, maps and other custom entries you can build complex and detailed adventures, quickly and easily in order to run exciting sessions with your players. As an added bonus Shard Tabletop will also make it easy to package what you build in order to reuse your creations across multiple campaigns, share with friends or distribute in our marketplace. Coming Soon!